The benefits of online measurement over offline laboratory tests
Moisture is a constantly varying component in the raw materials for many industrial applications and it is becoming more critical to measure and control accurately. Often laboratory tests are seen as being most accurate, but this article will show the limitations of these for real-time control and why online measurement is essential.
Many industrial processes batch the raw materials by weight and must achieve the correct balance of the dry ingredients to obtain a repeatable product. Any moisture content will cause problems if the weight of the water is not compensated.
An example of this would be 1000 kg of wet material at 10% moisture which contains only 909 kg of the actual dry material with 91 kg of water.

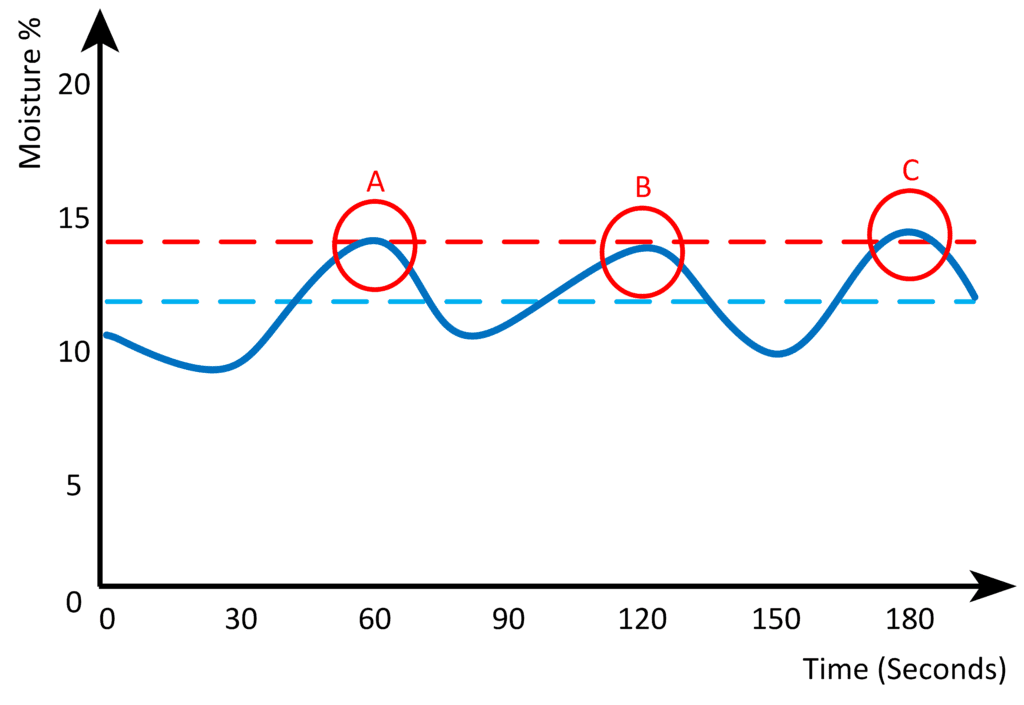
If the real-time process shown in Figure 1 is tested by collecting samples at the three marked points, these would average at 14% moisture, as shown by the upper line.
If the same process is averaged using data from the continuous measurement, this shows the batch is at 12% moisture, a 2% difference from the moisture calculated by the laboratory.
When this is applied to a process, even if the moisture is checked several times during the day, there will still be an unknown level of water due to this sampling error leading to unwanted results in the final product.
Online moisture sensors
It is possible to avoid this by using a properly installed and commissioned online sensor to continuously measure the material where the control is needed. Control software can then be written to automatically compensate the process as the moisture varies.
Any installed equipment must be accurately calibrated to the material in the process to achieve the best and most accurate results. It is best to install any moisture sensors after the final installation as any change in the sensor positioning can affect the measurement.
The calibration procedure consists of taking samples of the material flow from directly beneath or after the sensor installation whilst recording an average value of the sensor value. The material sample must be tested using a standard moisture laboratory test, and this result matched with that recorded. After obtaining several results, it is possible to define the relationship between them using mathematical techniques.
Sensor Technology
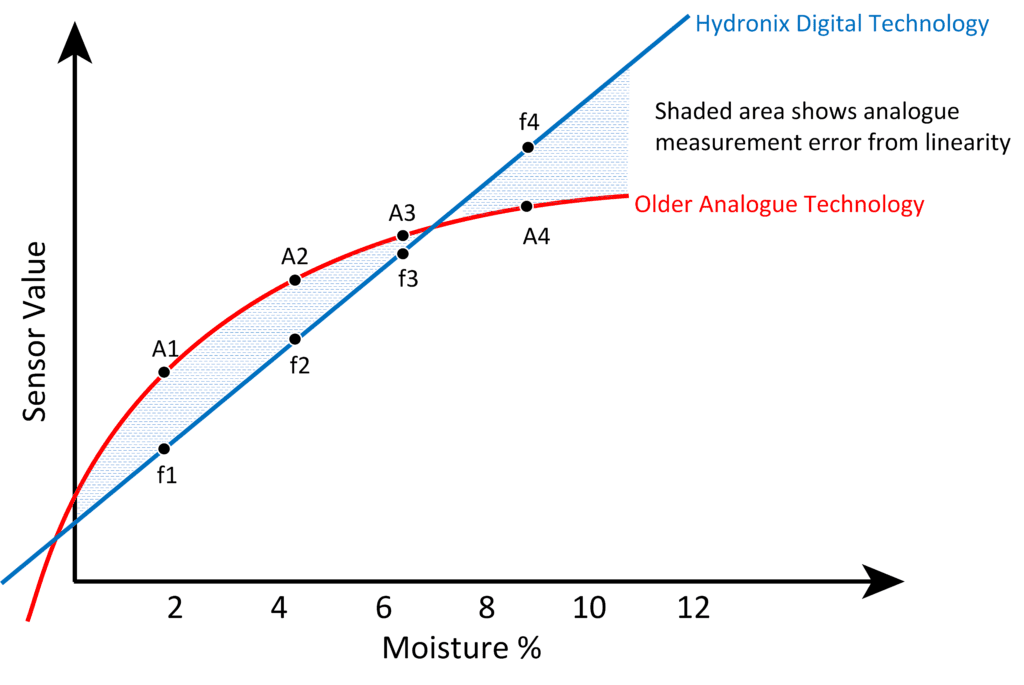
Older technology sensors using either resistive, capacitive, or analogue microwave techniques have a non-linear calibration, so a graph of the sensor value against the moisture change has a curve labelled as ‘Older Analogue Technology’ in Figure 2.
The non-linear relationship has a more complex mathematical definition. This relationship must be managed either using a highly complex calibration process with many sample results and curve-fitting software or an assumption of linearity, which results in the errors indicated by the shaded area in Figure 2.
There is also a maximum point above where the curve flattens, showing that the sensor has a much lower sensitivity and cannot react to any moisture above this point.
A linear relationship between the moisture and the sensor value allows a much simpler calibration. The sample results follow a straight line allowing the use of the standard gain/offset calculation usually expressed as y=Bx+C (where B is the gain and C is the offset), shown as ‘Hydronix Digital Technology’ in Figure 2.

Digital Measurement
Sensors with a digital measurement technique have a naturally linear output, which gives a sensor reading directly and proportionally related to the moisture content. This method allows systems to achieve optimal calibration with a few points.
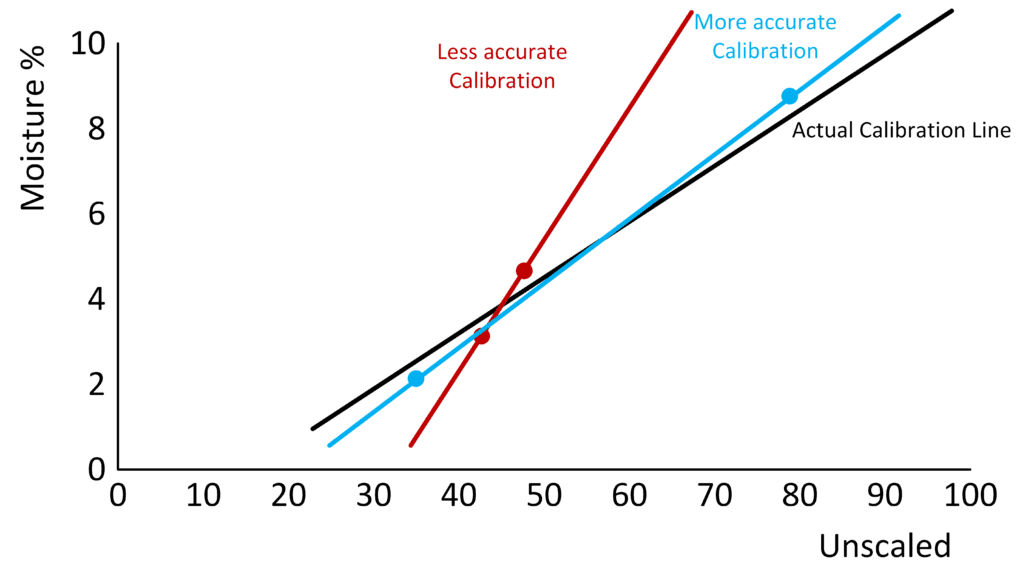
With the linear measurement, it is possible to achieve a calibration with only two points. As already demonstrated, there is still likely to be errors in the sampling and laboratory test for each of the points. It is vital to gather samples and corresponding sensor values with as wide a spread as possible between the low and high moisture samples for an accurate result. In Figure 3, all the samples have a 0.3% error from the actual moisture. By using low and high moisture samples that have a wider range (shown in blue), the influence of the errors is reduced. This provides a much more accurate calibration line than using samples that are close together (shown in red).

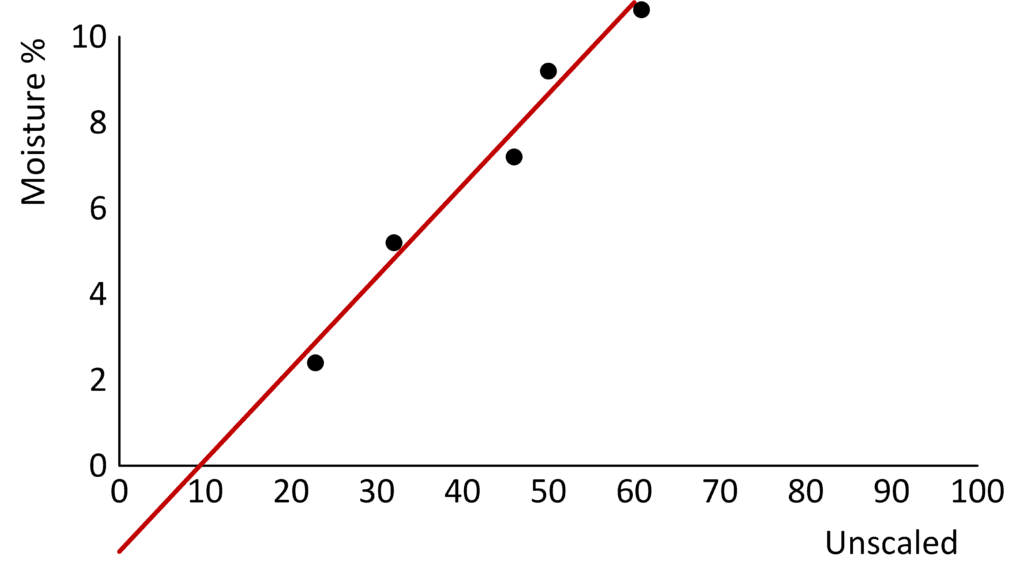
In real-world applications, it is best practice to add more samples, reducing the errors from only using a small set of samples. As Figure 4 shows, using a linear sensor and a simple mathematical formula, it is possible to generate a line of best fit, which reduces the influence of the errors from individual points.

Hydronix moisture measurement sensors use a digital multi-frequency measurement technique that gives a linear measurement, where the sensor value and water content are directly proportionally related. This method allows the sensor to be more accurate throughout the moisture range and calibrated more precisely, removing the need for recalibrations after commissioning.
Hydronix is represented by a network of local expert engineers in over 80 countries worldwide, speaking your language.

